Thursday, September 12


How to backup bookmark in google chrome??

METHOD 1 (Using the computer windows)
  1. Open Bookmark Manager Dont know?? Refer here
  2. Click "Organize"
  3. Click "Export bookmarks to HTML file... "
  4. Name the file and save it wherever you want
  5. You are done!

METHOD 2 (You can save it with offline HDD)
  1. Just go to C:\Documents and Settings\UserName\Local Settings\Application Data\Google\
  2. Copy the folder name "Chrome"... 
  3. You are done!! Just that... it will backup your profile (if you have it, and if not it will just backup the default) and all the bookmarks and stuff...
That's all :)


Method 1
Just simply hit Ctrl+Shift+O

Method 2
Open your google chrome and click that button
Then go to "Bookmarks" ->> "Bookmark Manager"

That's it!! :)

Friday, July 26

Hello readers..

Today, SCT is going to show you a simple method on bypassing ISP's blocked website. This is just for your knowledge and please do not miss-use this great tricks.

For your information, there are many ways to bypass that like using Proxy sites, proxy addresses, VPNNetworks but i will share with you one way which is the easiest and which helped me. 

When we connect to the internet from our computer, it will basically look for a DNS (Domain Name System)

Basically, how the ISP’s block  your connection to those blocked sites such as torrent sites, etc??
They block all the connections from the DNS to those websites. Hence, when you are in their DNS (Those blocked one), they have the total control of where you can go, and where you can’t, and obviously, they do not let you go surf the blocked sites.

So what do we do to bypass them. we use an alternate DNS. There are many options available like OpenDNS, GoogleDNS, etc. The one that i am using is Google DNS, its very easy to configure.

Windows 7 Configurations
  1. Go the Control Panel
  2. Click Network and Internet, then Network and Sharing Center, and click Change adapter settings
  3. Select the connection for which you want to configure Google Public DNS. For example: Select the Networking tab. Under This connection uses the following items, select Internet Protocol Version 4 (TCP/IPv4) or Internet Protocol Version 6 (TCP/IPv6) and then click Properties
    - If you are using Ethernet LAN cable, to change the settings for an Ethernet connection, right-click Local Area Connection, and click Properties
    - If you are using Wireless, to change the settings for a wireless connection, right-click Wireless Network Connection, and click Properties

    If you are prompted for an administrator password or confirmation, type the password or provide confirmation.

  4. Click Advanced and select the DNS tab. If there are any DNS server IP addresses listed there, write them down for future reference, and remove them from this window.
  5. Click OK.
  6. Select Use the following DNS server addresses. If there are any IP addresses listed in the Preferred DNS server or Alternate DNS server, write them down for future reference.
  7. Replace those addresses with the IP addresses of the Google DNS servers:Restart the connection you selected in step 3.

    For IPv4: 8.8.8.8 and/or 8.8.4.4
    For IPv6: 2001:4860:4860::8888 and/or 2001:4860:4860::8844
  8. Test that your setup is working correctly (From your browser, type in a hostname, such as http://www.google.com. If it resolves correctly, bookmark the page, and try accessing the page from the bookmark. If both of these tests work, everything is working correctly)
Repeat the procedure for additional network connections you want to change.


This is what i did to bypass the imposed restrictions and it worked!!

Enjoy you blocked sites.. LOL!!!


Monday, July 22

Windows XP Updates Error Number 0x80244019

How to Fix Windows XP Updates Error Number 0x80244019

Have you ever being fed-up facing a computer that unable to update??
Microsoft update is very important for those technician to make sure their customer laptop is up-to-date in delivering a good experience exercise. 

However, this may seems like an out of date problem, but those of you who do tech support and repair computers regularly know Windows XP is still in use on a very large number of machines. 

Error number: 0x80244019. It's related to installing updates on a Windows XP machine. I have a fairly simple solution below:

Method 1
  1. First, try to upgrade to Internet Explorer 8 (IE8) DOWNLOAD LINK CLICK HERE
  2. Reboot Machine - Try Updates again.
  3. If updates is working, then that's it!! YOU ARE DONE!!
  4. BUT!!!! If that does not work, try method 2.
Method 2
  1. Download Windows Update Agent DOWNLOAD LINK CLICK HERE
  2. Save the .exe file to your C: drive
  3. Click Start, and then click Run.
  4. Type "C:\WindowsUpdateAgent30-x86.exe /wuforce"  then click OK
  5. Install Windows Update agent.
  6. Restart the PC and try Windows Updates again. (Should work now!)

I hope that is helpful to anyone getting this annoying error.

NOTE & ALTERNATE DOWNLOADS:
I can not guarantee Microsoft will keep supporting older systems ... If the above download links are no longer working, download the files here:

Internet Explorer 8: ie8-windowsxp-x86-enu.exe
Windows Update Agent: windowsupdateagent30-x86.exe

Friday, July 5

Windows XP Updates Error Number 0x80244019

Unable to Install Windows XP over Windows 7

Have you ever facing a problem of this??

You have installed windows 7 and want to switch back to windows XP. BUT!! You are not able to install it. Maybe, it will gives a blue screen and says the harddrive might be curropted or there might be virus. I formatted the drive once even then the same problem.

STEPS:
  1. On the Setup of your bios, choose the "ATA" instead of "AHCI" on the SATA configuration.
  2. Then now apply the changes.(normally, button F10 will do the command)
  3. Then insert your cd on the cd rom. make sure you have chosen the cd as your first boot device.

Thursday, June 13


STEPS:
  1. Download “EnableRegTool.inf” and "EnableRegTool.reg"
  2. Put those files in a same folder
  3. Right click at "EnableRegTool.inf" and choose “Install
  4. Wallaaaa~~~!! YOU ARE DONE!!
Credit to SoftSurf

Sunday, May 26


The HP Mini 110 Boot key list:

F1 = SYSTEM INFORMATION
F2 = STARTUP CHECK
F9 = CHANGE BOOT DEVICE ORDER
F10 = BIOS SETUP OPTION
F11 = SYSTEM RECOVERY


Sunday, May 12


TOOLS THAT REQUIRED:

  1. Pendrive at least 512KB 
  2. HP USB Disk Storage Format Tool Don't have? Click here to download HP USB Disk Storage Format Tools
  3. Win98boot Don't have? Click here to download Win98
  4. Ghost software Don't have? Click here to download Ghost


MAJOR STEPS:

  1. Format pendrive using HP USB Disk Storage Format Tool while create the boot of win98.
  2. Copy all files and paste into pendrive
  3. Install the ghost software.


MAJOR STEPS 1 INSTRUCTION (FORMAT PENDRIVE USING HP USB DISK STORAGE FORMAT TOOL WHILE CREATE THE BOOT OF WIN98):

  1. Format pendrive using HP USB Disk Storage Format Tool while create the boot of win98.
  2. Install the ghost software.
  3. Install the number 2 tools (HP USB Disk Storage Format Tool)
  4. Extract the number 3 tools (Win98boot)
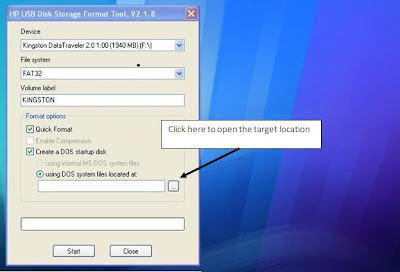
  5. Now, open the HP USB Disk Storage Format Tool application.
  6. Open the HP USB Disk Storage Format Tool
  7. After that, click "Quick Format" and click "Create a DOS Startup Disk" 
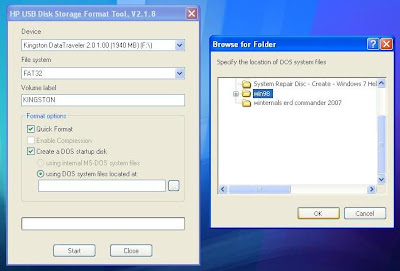
  8. The target file is win98
  9. Choose the 3rd tools you have extract "win98". Then, click "Ok". After that, click "Start"
  10. Click "OK" and "Start"
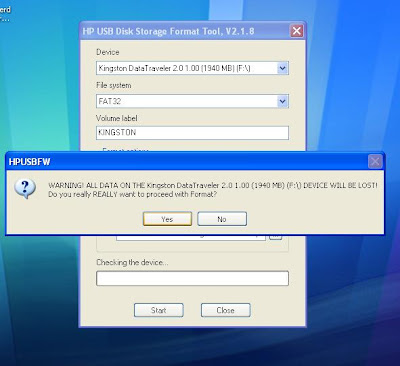
  11. Now, click "Yes" when you been prompt and wait until it finish formating your pendrive.
  12. Click "Yes"
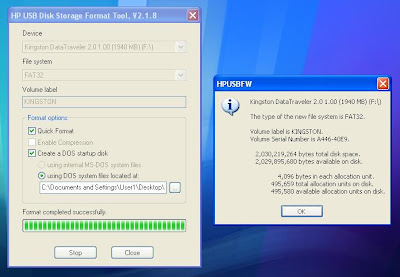
  13. You should see as the below picture after finish formatiing your pendrive. Then, click "OK" and "Close".
  14. Click "OK" and "Close"
  15. YOU HAVE COMPLETE THE MAJOR 1 STEPS.


MAJOR STEPS 2 INSTRUCTION (COPY ALL FILES AND PASTE INTO PENDRIVE):

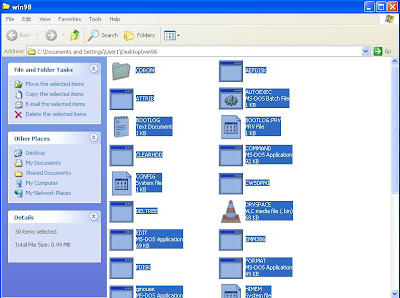
  1. Open the Win98 folder and copy all of the files.
  2. Copy all files in "Win98" folder
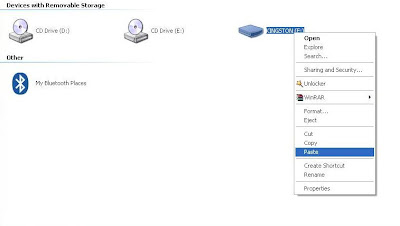
  3. Paste all of the files in the same pendrive.
  4. Paste the files in your pendrive
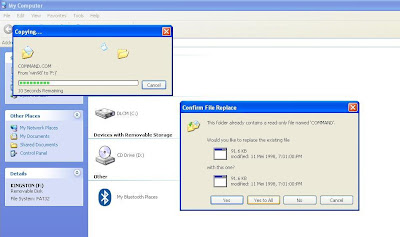
  5. Click "Yes to all" the prompt and wait until finish.
  6. Click "Yes to all"
  7. YOU HAVE COMPLETE THE MAJOR 2 STEPS.


MAJOR STEPS 3 INSTRUCTION (INSTALL THE GHOST SOFTWARE):

  1. Open the ghost software
  2. Click "Run"
  3. Click "Run"
  4. Click as shown below
  5. Click as shown
  6. Click as shown below
  7. Click as shown
  8. Click as shown below
  9. Click as shown
  10. Click as shown 
  11. Click as shown
  12. Click as shown
  13. Click as shown
  14. YOU HAVE COMPLETE THE MAJOR 3 STEPS.
Now, you are done!! You have a bootable pendrive with ghost software in it. CONGRATULATIONS!!

Monday, May 6


STEPS:
  1. Go to Start
  2. Click Run..
  3. Type “regedit” and click on "OK"
  4. Type "regedit" and click on "OK"
  5. Now it opens the Registry Editor
  6. This is Registry Editor


STEPS:
  1. Open the registry dialog box   Don't know? Click here for guide..
  2. Follow the address: [HKEY_CURRENT_USER\Software\Microsoft\Windows NT\CurrentVersion\Windows]
  3. You will see the string called load, and its value is something like this: msuwflvuSSsc.exe
  4. The Registry Editor
  5. Make sure you have permission to edit the key
  6. Click "Edit" -> "Permissions"... 
  7. Edit > Permission
  8. Then tick the box "Full Control" in the "Allow"

  9. Then, click "Apply" -> "OK"
  10. Now, modify the value of "load". 
  11. Click on "load" -> Click "Edit" -> Click "Modify"
  12. Modify the value
  13. Now, it will appear like below. 
  14. Modify the value
  15. Delete the value and click "OK"
  16. Delete the value
  17. Make sure the load value is empty
  18. The value for load is empty
  19. Close the regedit dialog box, and restart your PC/Laptop. YOU ARE DONE!!
Subscribe to RSS Feed Follow me on Twitter!